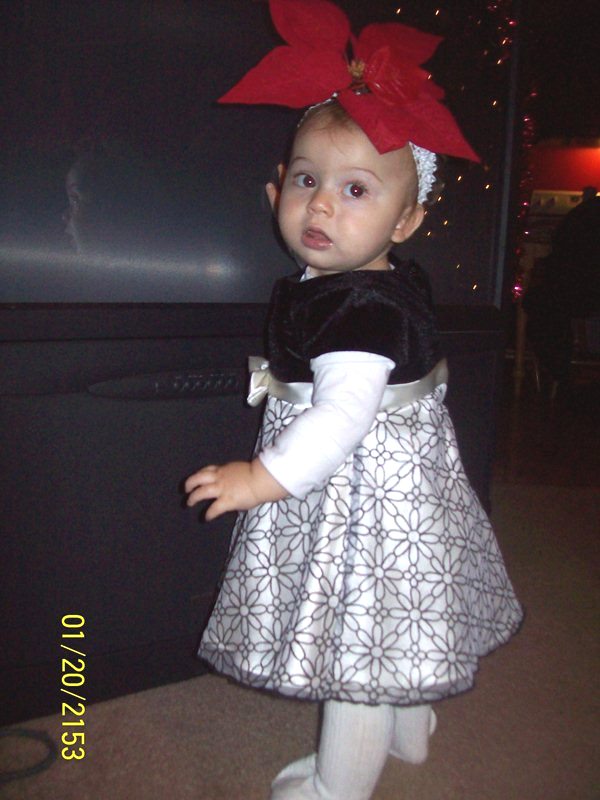
Okay, so I pretty much have designed most of Madeline's headbands with decorative flower pins which are easy as pie to make for any old person with a glue gun. Don't know why it popped into my head, but after I put on Maddie's black dress to look festive for the Christmas Merry-Go-Round in our town, It seemed like the outfit just wouldn't be right without a poinsetta. Of course, my creative juices bubbled at the thought of it and 5 minutes later with a white head band, an aligator clip and a clipping from one of my artificial poinsetta plants, Houston, we were ready for liftoff. Of course, Maddie could practically soar above the high seas with this huge flower over her head, but I personally think the bigger, the cuter.
We are at the stage where she likes to pull any foreign object off of her body-including socks, headbands, pacifier clips and the list goes on..but after distracting her with Christmas songs, all seemed to go well. A few fun pics later, we had another unique memory to add to our Caldwell Christmas. I would recommend spicing up any headband with a cute present bow also if you aren't into spending the extra effort to go buy a poinsetta- they are just as cute! I think I will be doing this for her birthday next week as well- it will be simple and cute!
Merry Christmas, all! I will be posting my Scotcharoos tomorrow that I got from Jess at Mad In Crafts. You can go to her blog by clicking her button under the "Blogs I Love to Visit" section.They look tasty and I couldn't resist!
Friday, December 24, 2010
Tuesday, December 21, 2010
My Ephiphany..A Storm Is Coming
If you have been dealing with a lot..click my babble below this picture.............I took this at my apartments and what I wrote came to mind while looking out the window.
Sunday, December 19, 2010
Family Craft Moment
Christmas cannot be defined in one single sentence or word. I like that it means different things to different people. Amongst the baked m&m cookies, fun just sitting in the livingroom with family while Christmas shows come on, and a graduation celebration for James, I picked up some foam crafts from Wal-mart that I thought would be easy enough for everyone to participate in. I think it was relatively easy to assembly, but the little adhesive dots that comes in the kit was extremely stubborn and would not let my gingerbread man's buttons stay on.
OK, So I cheated and used a glue-stick..but it ended up great anyway and we decorated the tree with them..poor ornaments didn't stand a chance near them! Kortney would have won if it were a contest, then Amy with her cute Snowman, and then mine, coming in last due to the eyeballs threatning to fall off my gingerbread man..(and what gingerbread man has curly hair?)but besides that I would say this would make a super-fun kid craft..and only 2 bucks..you know I was estatic about that! I wish real gingerbread decor was this easy..then maybe I wouldn't want to throw them against the wall next time and feel like Ebenezer Scrooge. Merry Christmas, all...6 more days!
Saturday, December 18, 2010
Newest Project: B'Leggings A.K.A Baby Leggings
Unlike my more artisticly inclined blogger collegues, I seem to shutdown after about 10 steps of trying to learn a new project- I am a simple girl and if it appears complex, I get frustrated easily. However, this is the opposite of what I have to say about the new feat I have finally performed, what I like to call "B'Leggings" or Baby leggings. All I have to say is...It was pretty fun! I had planned to pick up the sewing machine from my mother-in-law's to assist me in the sewing section of this craft project, however, the sewing machine decided to stay out of commission, leaving me to depend upon my crude hand-sewing skills.
Usually at the sound of that- I would cringe, but the God of arts and crafts (the same one who loves me even when I want to throw a wad of knotted up thread in the air after getting tangled up) seemed to smile upon me and much to my surprise- allowed me to finish this quite successfully with my meager skills.
So, let's get down to the nitty gritty. First of all, the materials required were minimal, only a pair of longer socks that have a pattern you would like..in this case, I chose some cute striped socks from Wally-World, only cost me about 3 bucks, some thread, and a needle.
(Note: Exciting part..You save a good chunk of change on doing this..as most baby leggings run about $15.00+ on the internet!)
Once you have your items before you, the first thing you will want to do is to cut off the section that ends at the heel of the sock. See where my scissors are..you will want to cut about here- but be sure to keep this cut off section..you will need it in a minute.
Now, along with my unprofessional sewing, I was blessed with not being able to cut straight, so as a forenote, if you can trim your edges straight, they will not be jagged and will not be as apt to curl while you are working with them later.
What you will want to cut next will be your toe section from the part you have just set aside. (Please see the placement of the scissors once again..)
So now, you are left with just two pieces- the small square section you have just cut, and the long section of the sock. For the sake of future reference purposes, let's call it the longer section and the smaller, square section. You can discard the toe and the heel section now.
With the smaller, square section, you will be folding half inside-out. (Almost like you are folding in socks but you will only fold halfway where the two sections meet together.) This will leave you with a small section with a raw side where you had cut previously and a folded side.
Once you have all of these sections lined up (be sure to make sure they are--this will not work correctly if not) you will be sewing around the entire circumference on the top where your fingers are. If it is easier, you can put in some small pins to keep the layers lined up as you sew,
You can either use a sewing machine, or if you are limited such as I, your hands. However, remember that if you use a sewing machine, you will want to sew on the INSIDE, not outside of the smaller section- as it will be hard to keep all the layers together, otherwise. Also, you will want to remove the pins as you sew.
Once, you have finished sewing this section all the way around, you will pull the cuff down. And, ta-da... you are finished!
Usually at the sound of that- I would cringe, but the God of arts and crafts (the same one who loves me even when I want to throw a wad of knotted up thread in the air after getting tangled up) seemed to smile upon me and much to my surprise- allowed me to finish this quite successfully with my meager skills.
So, let's get down to the nitty gritty. First of all, the materials required were minimal, only a pair of longer socks that have a pattern you would like..in this case, I chose some cute striped socks from Wally-World, only cost me about 3 bucks, some thread, and a needle.
(Note: Exciting part..You save a good chunk of change on doing this..as most baby leggings run about $15.00+ on the internet!)
Once you have your items before you, the first thing you will want to do is to cut off the section that ends at the heel of the sock. See where my scissors are..you will want to cut about here- but be sure to keep this cut off section..you will need it in a minute.
Now, along with my unprofessional sewing, I was blessed with not being able to cut straight, so as a forenote, if you can trim your edges straight, they will not be jagged and will not be as apt to curl while you are working with them later.
What you will want to cut next will be your toe section from the part you have just set aside. (Please see the placement of the scissors once again..)
With the smaller, square section, you will be folding half inside-out. (Almost like you are folding in socks but you will only fold halfway where the two sections meet together.) This will leave you with a small section with a raw side where you had cut previously and a folded side.
Your section should look like this...
Once your edges have met (your result will look like a small wristband) you will be placing your longer section INSIDE this little section. You will end up having all of your layers lined up with one another and will end up with three layers. The raw edges will be facing downward, and the folded section will be facing upwards toward. This little section is going to be the cuff where the ankle goes.
Once you have all of these sections lined up (be sure to make sure they are--this will not work correctly if not) you will be sewing around the entire circumference on the top where your fingers are. If it is easier, you can put in some small pins to keep the layers lined up as you sew,
You can either use a sewing machine, or if you are limited such as I, your hands. However, remember that if you use a sewing machine, you will want to sew on the INSIDE, not outside of the smaller section- as it will be hard to keep all the layers together, otherwise. Also, you will want to remove the pins as you sew.
Once, you have finished sewing this section all the way around, you will pull the cuff down. And, ta-da... you are finished!
Repeat the same steps for your other sock, and you have a pair of cute little baby leggings a.k.a..B'Leggings!
Tuesday, December 14, 2010
Wordle=Addicting!
So Crafty Crystal got me addicted to Wordle! Love it! Can make your own design just through words! Here's mine!
http://www.wordle.net/show/wrdl/2886266/Things_Daphne_Likes
I have been really been thinking of some new projects to start working on and am thinking of baby leggings next! Got to get me some cute patterns in the next day or so so I can begin..but first I will have to pick up the sewing machine from my mother-in-law's house..so excited! Thank goodness I don't have to search for a million Christmas gifts, I have pretty much all of them except for a small select few- thank goodness for the internet!
-daph
http://www.wordle.net/show/wrdl/2886266/Things_Daphne_Likes
I have been really been thinking of some new projects to start working on and am thinking of baby leggings next! Got to get me some cute patterns in the next day or so so I can begin..but first I will have to pick up the sewing machine from my mother-in-law's house..so excited! Thank goodness I don't have to search for a million Christmas gifts, I have pretty much all of them except for a small select few- thank goodness for the internet!
-daph
Monday, December 13, 2010
Preparing for the 1st Year Birthday Celebration of Madeline Grace
Not only do I express my undying affection for my daughter through the any means of celebration that I can, but I am thoroughly estatic on any chance of opportunity for me to create, craft or construct something that will not fall apart 5 seconds later with my hands.
This little art escapade has flourished into a cupcake theme, the main colors consisting mostly of bright pink, lavendar and brown. I have already found an awesome tutorial online on how to create a baby tu-tu and happened across a thousand baby boutiques that feature "boutique baby party hats" which I evaluated and summed up that it would be relatively easy to recreate myself.
A trip to Hobby Lobby and a few runs to Wal-mart later, I finished the tu-tu in about a night and half an afternoon (I will remember next time not to wear a sweater when dealing with tulle in the winter as I am not a huge fan of electricity and objects sticking to my bum and pant legs and only to find out I have a large piece still attached after I go to work) and was quite pleased with the turnout.
Lesson- when you are judging the size of the waist band, a smart thing to do before working on it would be to fit the baby first. I used baby head bands and sewed them together because they have the elastic in them- but you can use elastic, adult headbands or ribbon. If you don't want to sew- you may want to stick with headbands!
Basically, from there, I just cut 16" strips of tulle, ( you will want to cut out double the size of how long you want the strip to be...ex: if you want the strip to hang about 8 inches from the waist band- cut 16"). Then you tie knots of the tulle all around- I alternated colors. You can put ribbons on too to add flourishes. If you have a chunky baby like Madeline, you may want a bit more of a scrunchy, poofy tutu like I made- but the longer the strips, the more flatter the tutu will be.
Also, I decided to make the hat match- basically took a regular party had, cut the pattern from scrapbooking paper (polka dots), hot glued feathery boa material around the bottom, glued a little pom to the top and hot glued a number one to the middle. Simple as that- and fun..especially on a day when it was as cold and attempting to snow with half the city out of power like our town was!
This little art escapade has flourished into a cupcake theme, the main colors consisting mostly of bright pink, lavendar and brown. I have already found an awesome tutorial online on how to create a baby tu-tu and happened across a thousand baby boutiques that feature "boutique baby party hats" which I evaluated and summed up that it would be relatively easy to recreate myself.
A trip to Hobby Lobby and a few runs to Wal-mart later, I finished the tu-tu in about a night and half an afternoon (I will remember next time not to wear a sweater when dealing with tulle in the winter as I am not a huge fan of electricity and objects sticking to my bum and pant legs and only to find out I have a large piece still attached after I go to work) and was quite pleased with the turnout.
Lesson- when you are judging the size of the waist band, a smart thing to do before working on it would be to fit the baby first. I used baby head bands and sewed them together because they have the elastic in them- but you can use elastic, adult headbands or ribbon. If you don't want to sew- you may want to stick with headbands!
Basically, from there, I just cut 16" strips of tulle, ( you will want to cut out double the size of how long you want the strip to be...ex: if you want the strip to hang about 8 inches from the waist band- cut 16"). Then you tie knots of the tulle all around- I alternated colors. You can put ribbons on too to add flourishes. If you have a chunky baby like Madeline, you may want a bit more of a scrunchy, poofy tutu like I made- but the longer the strips, the more flatter the tutu will be.
Also, I decided to make the hat match- basically took a regular party had, cut the pattern from scrapbooking paper (polka dots), hot glued feathery boa material around the bottom, glued a little pom to the top and hot glued a number one to the middle. Simple as that- and fun..especially on a day when it was as cold and attempting to snow with half the city out of power like our town was!
I'm going to start working on the highchair kit- pendants or a highchair tutu (that may overdo it..we'll see) and I am working on my first ever cupcake pops!
If you have never heard of them, you can find out what I mean by this link: Cupcake Pops
I will try to remember to come back and post pictures next time!
Adios,
-Daphne
Friday, November 12, 2010
Every Second Counts
Every second counts
Every minute's deep
Tossed like a wave
Always bittersweet
It will wrap you in it's arms
Take you for a ride
Touch you in a way
Somewhere far away, inside
You hold on longingly
Both hands clasping tight
Afraid of letting go,
You are consumed in all your fright
But the longer you hold on
The wearier you are
You can't look left or right
You can't look very far
Never looking forward
Because you're always looking back
The small joys in life you'd find
They are something that you lack
Don't worry about tomorrow
Don't stress about your past
Hold on to what's good and true
Because nothing ever lasts
Instead of looking backward
Instead of staying still
Look upont the one who's pierced
Who died upon the hill
Look upon the one who's splintered
Where thorns encrust his head
Look upon the one who gave us life, his body is our bread
Look upon the one whose blood is showered upon our souls
It gives us everlasting life and its cost is more than gold
If you are looking where you should you will find three things of truth
One, you'll never thirst again, or hunger, is number two
And third, your joy will return to you as if it never fled
But none of these things would come to pass if his blood was never shed.
By: Daphne Caldwell
Every minute's deep
Tossed like a wave
Always bittersweet
It will wrap you in it's arms
Take you for a ride
Touch you in a way
Somewhere far away, inside
You hold on longingly
Both hands clasping tight
Afraid of letting go,
You are consumed in all your fright
But the longer you hold on
The wearier you are
You can't look left or right
You can't look very far
Never looking forward
Because you're always looking back
The small joys in life you'd find
They are something that you lack
Don't worry about tomorrow
Don't stress about your past
Hold on to what's good and true
Because nothing ever lasts
Instead of looking backward
Instead of staying still
Look upont the one who's pierced
Who died upon the hill
Look upon the one who's splintered
Where thorns encrust his head
Look upon the one who gave us life, his body is our bread
Look upon the one whose blood is showered upon our souls
It gives us everlasting life and its cost is more than gold
If you are looking where you should you will find three things of truth
One, you'll never thirst again, or hunger, is number two
And third, your joy will return to you as if it never fled
But none of these things would come to pass if his blood was never shed.
By: Daphne Caldwell
Subscribe to:
Posts (Atom)
Welcome
Welcome to my babble blog! Here you will find: the random musings of a full-time stay-at-home mom and wife/part-time leasing specialist for three apartment communities, all-the-time crafter, whole-hearted worshipper, in-progress follower of Jesus Christ, and spontaneous hyper individual.
Because there are just so many facets of me..
Friday, December 24, 2010
Cheap way to add festive touches to the holiday season..
Okay, so I pretty much have designed most of Madeline's headbands with decorative flower pins which are easy as pie to make for any old person with a glue gun. Don't know why it popped into my head, but after I put on Maddie's black dress to look festive for the Christmas Merry-Go-Round in our town, It seemed like the outfit just wouldn't be right without a poinsetta. Of course, my creative juices bubbled at the thought of it and 5 minutes later with a white head band, an aligator clip and a clipping from one of my artificial poinsetta plants, Houston, we were ready for liftoff. Of course, Maddie could practically soar above the high seas with this huge flower over her head, but I personally think the bigger, the cuter.
We are at the stage where she likes to pull any foreign object off of her body-including socks, headbands, pacifier clips and the list goes on..but after distracting her with Christmas songs, all seemed to go well. A few fun pics later, we had another unique memory to add to our Caldwell Christmas. I would recommend spicing up any headband with a cute present bow also if you aren't into spending the extra effort to go buy a poinsetta- they are just as cute! I think I will be doing this for her birthday next week as well- it will be simple and cute!
Merry Christmas, all! I will be posting my Scotcharoos tomorrow that I got from Jess at Mad In Crafts. You can go to her blog by clicking her button under the "Blogs I Love to Visit" section.They look tasty and I couldn't resist!
We are at the stage where she likes to pull any foreign object off of her body-including socks, headbands, pacifier clips and the list goes on..but after distracting her with Christmas songs, all seemed to go well. A few fun pics later, we had another unique memory to add to our Caldwell Christmas. I would recommend spicing up any headband with a cute present bow also if you aren't into spending the extra effort to go buy a poinsetta- they are just as cute! I think I will be doing this for her birthday next week as well- it will be simple and cute!
Merry Christmas, all! I will be posting my Scotcharoos tomorrow that I got from Jess at Mad In Crafts. You can go to her blog by clicking her button under the "Blogs I Love to Visit" section.They look tasty and I couldn't resist!
Tuesday, December 21, 2010
My Ephiphany..A Storm Is Coming
If you have been dealing with a lot..click my babble below this picture.............I took this at my apartments and what I wrote came to mind while looking out the window.
Sunday, December 19, 2010
Family Craft Moment
Christmas cannot be defined in one single sentence or word. I like that it means different things to different people. Amongst the baked m&m cookies, fun just sitting in the livingroom with family while Christmas shows come on, and a graduation celebration for James, I picked up some foam crafts from Wal-mart that I thought would be easy enough for everyone to participate in. I think it was relatively easy to assembly, but the little adhesive dots that comes in the kit was extremely stubborn and would not let my gingerbread man's buttons stay on.
OK, So I cheated and used a glue-stick..but it ended up great anyway and we decorated the tree with them..poor ornaments didn't stand a chance near them! Kortney would have won if it were a contest, then Amy with her cute Snowman, and then mine, coming in last due to the eyeballs threatning to fall off my gingerbread man..(and what gingerbread man has curly hair?)but besides that I would say this would make a super-fun kid craft..and only 2 bucks..you know I was estatic about that! I wish real gingerbread decor was this easy..then maybe I wouldn't want to throw them against the wall next time and feel like Ebenezer Scrooge. Merry Christmas, all...6 more days!
Saturday, December 18, 2010
Newest Project: B'Leggings A.K.A Baby Leggings
Unlike my more artisticly inclined blogger collegues, I seem to shutdown after about 10 steps of trying to learn a new project- I am a simple girl and if it appears complex, I get frustrated easily. However, this is the opposite of what I have to say about the new feat I have finally performed, what I like to call "B'Leggings" or Baby leggings. All I have to say is...It was pretty fun! I had planned to pick up the sewing machine from my mother-in-law's to assist me in the sewing section of this craft project, however, the sewing machine decided to stay out of commission, leaving me to depend upon my crude hand-sewing skills.
Usually at the sound of that- I would cringe, but the God of arts and crafts (the same one who loves me even when I want to throw a wad of knotted up thread in the air after getting tangled up) seemed to smile upon me and much to my surprise- allowed me to finish this quite successfully with my meager skills.
So, let's get down to the nitty gritty. First of all, the materials required were minimal, only a pair of longer socks that have a pattern you would like..in this case, I chose some cute striped socks from Wally-World, only cost me about 3 bucks, some thread, and a needle.
(Note: Exciting part..You save a good chunk of change on doing this..as most baby leggings run about $15.00+ on the internet!)
Once you have your items before you, the first thing you will want to do is to cut off the section that ends at the heel of the sock. See where my scissors are..you will want to cut about here- but be sure to keep this cut off section..you will need it in a minute.
Now, along with my unprofessional sewing, I was blessed with not being able to cut straight, so as a forenote, if you can trim your edges straight, they will not be jagged and will not be as apt to curl while you are working with them later.
What you will want to cut next will be your toe section from the part you have just set aside. (Please see the placement of the scissors once again..)
So now, you are left with just two pieces- the small square section you have just cut, and the long section of the sock. For the sake of future reference purposes, let's call it the longer section and the smaller, square section. You can discard the toe and the heel section now.
With the smaller, square section, you will be folding half inside-out. (Almost like you are folding in socks but you will only fold halfway where the two sections meet together.) This will leave you with a small section with a raw side where you had cut previously and a folded side.
Once you have all of these sections lined up (be sure to make sure they are--this will not work correctly if not) you will be sewing around the entire circumference on the top where your fingers are. If it is easier, you can put in some small pins to keep the layers lined up as you sew,
You can either use a sewing machine, or if you are limited such as I, your hands. However, remember that if you use a sewing machine, you will want to sew on the INSIDE, not outside of the smaller section- as it will be hard to keep all the layers together, otherwise. Also, you will want to remove the pins as you sew.
Once, you have finished sewing this section all the way around, you will pull the cuff down. And, ta-da... you are finished!
Usually at the sound of that- I would cringe, but the God of arts and crafts (the same one who loves me even when I want to throw a wad of knotted up thread in the air after getting tangled up) seemed to smile upon me and much to my surprise- allowed me to finish this quite successfully with my meager skills.
So, let's get down to the nitty gritty. First of all, the materials required were minimal, only a pair of longer socks that have a pattern you would like..in this case, I chose some cute striped socks from Wally-World, only cost me about 3 bucks, some thread, and a needle.
(Note: Exciting part..You save a good chunk of change on doing this..as most baby leggings run about $15.00+ on the internet!)
Once you have your items before you, the first thing you will want to do is to cut off the section that ends at the heel of the sock. See where my scissors are..you will want to cut about here- but be sure to keep this cut off section..you will need it in a minute.
Now, along with my unprofessional sewing, I was blessed with not being able to cut straight, so as a forenote, if you can trim your edges straight, they will not be jagged and will not be as apt to curl while you are working with them later.
What you will want to cut next will be your toe section from the part you have just set aside. (Please see the placement of the scissors once again..)
With the smaller, square section, you will be folding half inside-out. (Almost like you are folding in socks but you will only fold halfway where the two sections meet together.) This will leave you with a small section with a raw side where you had cut previously and a folded side.
Your section should look like this...
Once your edges have met (your result will look like a small wristband) you will be placing your longer section INSIDE this little section. You will end up having all of your layers lined up with one another and will end up with three layers. The raw edges will be facing downward, and the folded section will be facing upwards toward. This little section is going to be the cuff where the ankle goes.
Once you have all of these sections lined up (be sure to make sure they are--this will not work correctly if not) you will be sewing around the entire circumference on the top where your fingers are. If it is easier, you can put in some small pins to keep the layers lined up as you sew,
You can either use a sewing machine, or if you are limited such as I, your hands. However, remember that if you use a sewing machine, you will want to sew on the INSIDE, not outside of the smaller section- as it will be hard to keep all the layers together, otherwise. Also, you will want to remove the pins as you sew.
Once, you have finished sewing this section all the way around, you will pull the cuff down. And, ta-da... you are finished!
Repeat the same steps for your other sock, and you have a pair of cute little baby leggings a.k.a..B'Leggings!
Tuesday, December 14, 2010
Wordle=Addicting!
So Crafty Crystal got me addicted to Wordle! Love it! Can make your own design just through words! Here's mine!
http://www.wordle.net/show/wrdl/2886266/Things_Daphne_Likes
I have been really been thinking of some new projects to start working on and am thinking of baby leggings next! Got to get me some cute patterns in the next day or so so I can begin..but first I will have to pick up the sewing machine from my mother-in-law's house..so excited! Thank goodness I don't have to search for a million Christmas gifts, I have pretty much all of them except for a small select few- thank goodness for the internet!
-daph
http://www.wordle.net/show/wrdl/2886266/Things_Daphne_Likes
I have been really been thinking of some new projects to start working on and am thinking of baby leggings next! Got to get me some cute patterns in the next day or so so I can begin..but first I will have to pick up the sewing machine from my mother-in-law's house..so excited! Thank goodness I don't have to search for a million Christmas gifts, I have pretty much all of them except for a small select few- thank goodness for the internet!
-daph
Monday, December 13, 2010
Preparing for the 1st Year Birthday Celebration of Madeline Grace
Not only do I express my undying affection for my daughter through the any means of celebration that I can, but I am thoroughly estatic on any chance of opportunity for me to create, craft or construct something that will not fall apart 5 seconds later with my hands.
This little art escapade has flourished into a cupcake theme, the main colors consisting mostly of bright pink, lavendar and brown. I have already found an awesome tutorial online on how to create a baby tu-tu and happened across a thousand baby boutiques that feature "boutique baby party hats" which I evaluated and summed up that it would be relatively easy to recreate myself.
A trip to Hobby Lobby and a few runs to Wal-mart later, I finished the tu-tu in about a night and half an afternoon (I will remember next time not to wear a sweater when dealing with tulle in the winter as I am not a huge fan of electricity and objects sticking to my bum and pant legs and only to find out I have a large piece still attached after I go to work) and was quite pleased with the turnout.
Lesson- when you are judging the size of the waist band, a smart thing to do before working on it would be to fit the baby first. I used baby head bands and sewed them together because they have the elastic in them- but you can use elastic, adult headbands or ribbon. If you don't want to sew- you may want to stick with headbands!
Basically, from there, I just cut 16" strips of tulle, ( you will want to cut out double the size of how long you want the strip to be...ex: if you want the strip to hang about 8 inches from the waist band- cut 16"). Then you tie knots of the tulle all around- I alternated colors. You can put ribbons on too to add flourishes. If you have a chunky baby like Madeline, you may want a bit more of a scrunchy, poofy tutu like I made- but the longer the strips, the more flatter the tutu will be.
Also, I decided to make the hat match- basically took a regular party had, cut the pattern from scrapbooking paper (polka dots), hot glued feathery boa material around the bottom, glued a little pom to the top and hot glued a number one to the middle. Simple as that- and fun..especially on a day when it was as cold and attempting to snow with half the city out of power like our town was!
This little art escapade has flourished into a cupcake theme, the main colors consisting mostly of bright pink, lavendar and brown. I have already found an awesome tutorial online on how to create a baby tu-tu and happened across a thousand baby boutiques that feature "boutique baby party hats" which I evaluated and summed up that it would be relatively easy to recreate myself.
A trip to Hobby Lobby and a few runs to Wal-mart later, I finished the tu-tu in about a night and half an afternoon (I will remember next time not to wear a sweater when dealing with tulle in the winter as I am not a huge fan of electricity and objects sticking to my bum and pant legs and only to find out I have a large piece still attached after I go to work) and was quite pleased with the turnout.
Lesson- when you are judging the size of the waist band, a smart thing to do before working on it would be to fit the baby first. I used baby head bands and sewed them together because they have the elastic in them- but you can use elastic, adult headbands or ribbon. If you don't want to sew- you may want to stick with headbands!
Basically, from there, I just cut 16" strips of tulle, ( you will want to cut out double the size of how long you want the strip to be...ex: if you want the strip to hang about 8 inches from the waist band- cut 16"). Then you tie knots of the tulle all around- I alternated colors. You can put ribbons on too to add flourishes. If you have a chunky baby like Madeline, you may want a bit more of a scrunchy, poofy tutu like I made- but the longer the strips, the more flatter the tutu will be.
Also, I decided to make the hat match- basically took a regular party had, cut the pattern from scrapbooking paper (polka dots), hot glued feathery boa material around the bottom, glued a little pom to the top and hot glued a number one to the middle. Simple as that- and fun..especially on a day when it was as cold and attempting to snow with half the city out of power like our town was!
I'm going to start working on the highchair kit- pendants or a highchair tutu (that may overdo it..we'll see) and I am working on my first ever cupcake pops!
If you have never heard of them, you can find out what I mean by this link: Cupcake Pops
I will try to remember to come back and post pictures next time!
Adios,
-Daphne
Friday, November 12, 2010
Every Second Counts
Every second counts
Every minute's deep
Tossed like a wave
Always bittersweet
It will wrap you in it's arms
Take you for a ride
Touch you in a way
Somewhere far away, inside
You hold on longingly
Both hands clasping tight
Afraid of letting go,
You are consumed in all your fright
But the longer you hold on
The wearier you are
You can't look left or right
You can't look very far
Never looking forward
Because you're always looking back
The small joys in life you'd find
They are something that you lack
Don't worry about tomorrow
Don't stress about your past
Hold on to what's good and true
Because nothing ever lasts
Instead of looking backward
Instead of staying still
Look upont the one who's pierced
Who died upon the hill
Look upon the one who's splintered
Where thorns encrust his head
Look upon the one who gave us life, his body is our bread
Look upon the one whose blood is showered upon our souls
It gives us everlasting life and its cost is more than gold
If you are looking where you should you will find three things of truth
One, you'll never thirst again, or hunger, is number two
And third, your joy will return to you as if it never fled
But none of these things would come to pass if his blood was never shed.
By: Daphne Caldwell
Every minute's deep
Tossed like a wave
Always bittersweet
It will wrap you in it's arms
Take you for a ride
Touch you in a way
Somewhere far away, inside
You hold on longingly
Both hands clasping tight
Afraid of letting go,
You are consumed in all your fright
But the longer you hold on
The wearier you are
You can't look left or right
You can't look very far
Never looking forward
Because you're always looking back
The small joys in life you'd find
They are something that you lack
Don't worry about tomorrow
Don't stress about your past
Hold on to what's good and true
Because nothing ever lasts
Instead of looking backward
Instead of staying still
Look upont the one who's pierced
Who died upon the hill
Look upon the one who's splintered
Where thorns encrust his head
Look upon the one who gave us life, his body is our bread
Look upon the one whose blood is showered upon our souls
It gives us everlasting life and its cost is more than gold
If you are looking where you should you will find three things of truth
One, you'll never thirst again, or hunger, is number two
And third, your joy will return to you as if it never fled
But none of these things would come to pass if his blood was never shed.
By: Daphne Caldwell
Subscribe to:
Posts (Atom)


